
In this article, I explain what casting silicone is and how the PixieCrafting silicone mold maker is used to cast an impression of something, i.e. make your own silicone molds. The individual steps and the results are explained in detail in the tutorial and illustrated in many pictures. Nothing can go wrong now, can it? 😉
Silicone – what exactly is it?
Silicone consists of
What is casting silicone?
Casting silicone is a two-component silicone which, after being mixed together, vulcanizes over time, i.e. turns into rubber. There are transparent silicones and colored silicones, and they all have different specifications regarding vulcanization time at certain temperatures. Depending on the type of silicone, the mold is soft, medium-hard or hard
What type is the PixieCrafting silicone mold maker?

Our PixieCrafting casting Silicone is a transparent, medium-hard silicone, which after mixing, takes about 3 hours to transform to rubber at a temperature of about 23 ° Celsius. If the temperature is higher, it works faster, at lower temperatures the process slows down. The transparency of the silicone also ensures the mold can be used with UV resin. In the meantime, we have replaced our silicone in the shop with the high-quality Choose Yourself mold maker silicone, which is not as transparent but degasses better on its own, additionally it is food safe, so you can use it for chocolate pralines and cookie dough as well.
What do I need to cast a silicone mold?

- Smooth surface
- Casting silicone
- book cover film or masking tape
- Cookie-cutter
- Hot glue or play dough
- Paper or plastic cups
- Chopsticks for stirring
- Precision scale
- Motif to cast
Casting your own molds – how it’s done!
My goal is a mostly bubble-free mold. As vulcani
Step 1) Put the silicone in the fridge

I put the silicone in the fridge for about half an hour. This lowers the temperature of the silicone and I have more time to mix and pour. In the meantime, I can prepare the frames which will hold the silicone.
Step 2) Prepare frames and materials

Cookie-cutters of different sizes are suited nicely as a frame for casting silicone. I have found these shown in the picture at
Hint: According to Andrea L., plastic bowls are also suitable as frames with the bottom removed. Simply flip them over and put them on the book cover film. Bottomless tin cans should also work well. Thanks, Andrea for the hint! ❤

Book cover film is suitable to stick on both the cookie cutter and the blank. The packing size for the film is also quite generous, it will be enough for some molds. 😉 Libro had two different varieties, but I did not notice any significant difference. Both have done their job very well. Please do not use the green tape for bezels – it sticks to the silicone too much! I will spare you the picture 😆

I attach the book cover film with the sticky side up onto a smooth surface. I have used an acrylic platform as a base, but of course a normal wooden board, or a large flat Tupperware works as well. I stick the cookie cutter upside down on the book cover film.
Hint: According to Dominik M. you can also use masking tape. It’s cheaper and better for the environment. Thanks, Dominik for the hint! ❤


Hint: According to Dominik M., there is no need to seal the frame if it has sufficient adhesive surface and cannot be adjusted.


Hint: Glue the blanks on the book cover film immediately! I waited for 2 hours and therefore they did not stick that well! As a result, it might happen that some silicone flows under the blank like it did for me! Not a big tragedy, but still it can be avoided.
Step 3) Mix the silicone


Step 4) Bleed the silicone in a vacuum chamber (optional)

I put the silicone in the vacuum chamber for about five minutes (including vacuum build up). In retrospective, I should have left the cup in the chamber for five minutes longer. 😆 Important: The air in the silicone expands in a vacuum and begins to foam. To avoid overspill, I intentionally used a very large paper cup in the mixing process, which was practically two-thirds empty.
Hint: According to Andrea
Step 5) Pour the silicone


Hint:According to Dominik M., you can put a previously vacuumed silicone in the vacuum chamber again after pouring it into the frame. Since most of the air has been removed by the first round, the silicone in the frame should not foam so highly. Thanks, Dominik for the hint! ❤
Step 6) Put the frames in the fridge

I put the poured silicone in the fridge again for 30 minutes (it can also be more) to let the air rise longer again. Without this step, the mold would certainly have had a lot more bubbles.
Step 7) Take the frames out of the fridge and let the silicone sit


Hint: According to Andrea L., you can use a lighter to pop superficial bubbles at this stage. I did not do that with these molds! Thanks, Andrea for this hint! ❤
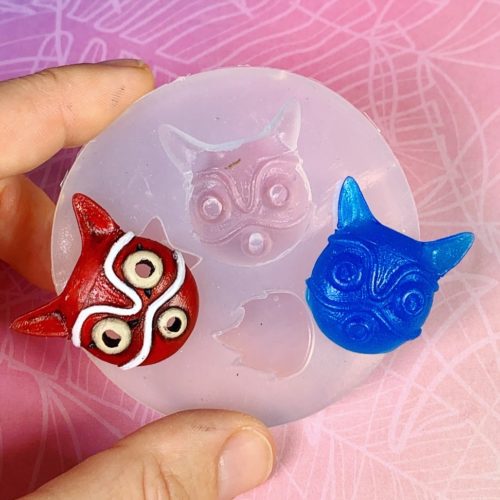
Step 8) Demold the silicone
I carefully push the silicone out of the cookie-cutter, and remove the commercial blanks with ease. The mask is connected to the rest of the silicone through the holes in the eyes, but I can cut it off to free it. I could also cut off the edges of the mold itself with scissors.


Step 9) Use your own silicone mold
I used the molds with UV resin to test the transparency. It works wonders with (our) UV resin, I could not notice any difference in the curing time compared to a commercial mold. With the colors I used here, my default setting for the PixieCrafting UV resin in the 36 watt halogen nail lamp is 3 minutes per side and that worked well. The crafted pieces were not sticky afterwards. Please remember that with darker and less transparent colors you have to extend the curing time under the lamp.


Conclusion
My second silicone molds were already much better than the first ones, and I’m sure I can achieve a completely bubble-free result in the future by following the additional hints. I used 40g of silicone for the bigger mold, and 20g for the small one. I still have enough left in the bottles for at least one more mold – the set contains a total of 110g. Making silicone molds is not that difficult – so give it a try! 🙂
Where can I buy the PixieCrafting silicone mold maker?
The Choose Yourself silicone mold maker is available as a 1kg set in our shop:
Click here to buy the silicone mold maker!
I get the process, but a video would help?!
Recently, I recorded myself with the now available silicone mold maker for a very simple mold. Leave a like or comment to ask a question! 🙂


Kommentar schreiben